A proper seat is essential for track driving. In fast corners, you don’t want to fight against G-forces or slide around, losing focus. The OEM seats in the E46 M3 are comfortable but lack the side support needed for spirited driving and track use. That’s why I decided on a Recaro Pole Position installation, paired with Speed Engineering seat mounts, for a secure and stable seating position.
Beyond better control, this swap also brings significant weight savings. The stock seats are heavy, and reducing weight improves both handling and performance. At the end of this guide, I’ll break down exactly how much weight was saved.
If you’re wondering why bucket seats are a great upgrade, how to choose the right size, or which seat mounts to use, check out my in-depth article on bucket seats and seat mounts.
Removing the Stock Seat
Removing the Seatbelt Buckle
Installing the Seat Mount
Attaching the Seat Slider
Installing the Side Brackets (L-Brackets) and Recaro Seat
This guide is for informational purposes only and is based on my personal experience. Please take all necessary safety precautions, and if you’re unsure, consult a professional.
1. Removing the Stock Seat
1.1 Loosening the Rear Bolts: The stock seat is secured to the car with four mounting points. Start by removing the two 16mm bolts at the rear. If you can’t see them, move the seat forward for better access.
1.2 Loosening the Front Nuts: Slide the seat all the way back to reveal the two 16mm nuts at the front. In my case, they were covered with dust caps. Remove the caps and loosen the nuts.
1.3 Tilting the Seat Back: With all four fasteners removed, the seat is now loose. Carefully tilt it backward to expose the wiring underneath.
1.4 Locating the Seat Connector: You will now see the electrical connector that links the seat to the car’s wiring.
1.5 Unlocking the Connector: To disconnect it, slide the black locking tab on the connector to the side.
1.6 Disconnecting the Wiring: Once the locking tab is fully moved, you can pull the connector out and disconnect the seat from the car.
1.7 Removing the Seat: Now, lift the seat out of the car. Be careful—these things are ridiculously heavy, especially if you have electric seats with heating. This is also a great time to vacuum, as you’ll likely find a surprising amount of dirt and debris under the seat.
2. Removing the Seatbelt Buckle
2.1 Releasing the Seatbelt: Since I’m still using the factory three-point seatbelt, I need to remove both the seatbelt buckle and the seatbelt itself. If you’re switching to a harness setup, you can skip this step and move directly to Step 3. Start by removing the Torx T50 bolt in the footwell to free the seatbelt. The belt will later be routed through the Recaro seat.
2.2 Removing the Buckle from the Seat: Locate another T50 Torx bolt on the side of the stock seat—this secures the seatbelt buckle and pre-tensioner. Loosen and remove this bolt.
2.3 Accessing the Connector: Tilt the seat backward again to gain access to the yellow electrical connector attached to the buckle. Pull the yellow connector off the white plastic mount.
2.4 Opening the Connector: To open the connector, press the retaining tabs on both sides and push them upward.
2.5 Sliding Off the Cap: Once the retaining tabs are lifted, slide the black cap off the yellow connector to expose the internal wiring.
2.6 Separating the Wires: You’ll now see multiple wires running through the connector. Carefully pull out all the wires related to the seat—we only want to keep the wire for the seatbelt buckle. Depending on your seat’s features (heated seats, lumbar support, etc.), the number of wires may vary.
2.7 Freeing the Buckle Cable: To fully remove the seatbelt pre-tensioner, unclip the wire loom from the seat frame.
2.8 Seatbelt Buckle Removed: Now, you have the seatbelt buckle with its wiring and connector completely removed. You can reattach the black cap to the yellow connector.
3. Installing the Seat Mount
3.1 Foundation of the Seat Mount: The base consists of four parts and is bolted to the vehicle using the original BMW bolts. This forms the foundation for the entire seat installation.
3.2 Positioning the Main Brackets: First, align the two larger pieces in the car. Loosely secure them at the rear using the original BMW bolts and at the front using the two nuts. Use a 16mm socket.
3.3 Attaching the Cross Braces: Now, install the two connecting pieces. The front brace is secured with two bolts, while the rear brace uses four bolts. Initially, tighten them only loosely to allow for final adjustments. Use a 5mm Allen key.
3.4 Final Tightening: Once everything is correctly positioned, tighten all bolts. The BMW bolts should be torqued to 50 Nm (37 lb-ft), while the other bolts should be tightened to 35 Nm (26 lb-ft).
4. Attaching the Seat Slider
4.1 Choosing the Slider: You can use the original Recaro sliders or, like me, the ones from Speed Engineering. The slider consists of three parts: the two sliding rails and the adjustment lever.
4.2 Mounting Holes in the Seat Base: The seat base has multiple threaded holes to accommodate different sliders and to allow installation of various seat widths. For the Recaro Pole Position, the outer row of holes is used.
4.3 Installing the Sliders: Attach the sliders to the seat base using the supplied bolts. Use a 6mm Allen key. Place the small titanium plate under each bolt.
4.4 Adjusting the Sliders for Installation: To access the next set of holes, move the slider by pulling the adjustment lever upward and sliding the rail backward.
4.5 Easier Lever Operation: The lever can be difficult to pull up by hand due to the limited grip area. If needed, use a screwdriver or, like I did, an Allen key to make it easier to engage.
4.6 Securing the Front Bolts: Now, install the front bolts and tighten all slider bolts to 35 Nm (26 lb-ft).
4.7 Attaching the Adjustment Lever: Finally, insert the adjustment lever. If it doesn’t fit perfectly, you can slightly bend it outward or inward for a better fit. Make sure both sliders are in the same position before installing the lever; otherwise, they will be misaligned and move unevenly.
5. Installing the Side Brackets (L-Brackets) and Recaro Seat
5.1 Gathering the Components: Now we need the two L-brackets, the bucket seat, and the seatbelt buckle if you are keeping the OEM seatbelt.
5.2 Testing the Seating Position: Once installed, you won’t be able to adjust the seat height or angle inside the car. If you’re unsure about your preferred seating position, mount the L-brackets to the seat outside of the car and test different positions. On most track days, you will be wearing a helmet—if the seat is too upright, your helmet might hit the headrest and push your head uncomfortably forward. I personally prefer a slight recline for comfort, but not too far, as you still need proper steering wheel control.
5.3 Positioning the L-Brackets: Once you’ve found a comfortable seating position, take note of the holes you used and remove the L-brackets from the seat. Now, position them inside the car on the seat sliders. The 90-degree bracket goes on the inside, while the bracket with the bend goes on the outside.
5.4 Attaching the L-Brackets to the Sliders: Insert the bolts from underneath through the slider and fasten them to the L-brackets using washers under both the bolt head and the nut. Use a 13mm socket, but only tighten them loosely for now.
5.5 Adjusting the Sliders for Access: If you have trouble accessing the bolts, move the slider forward or backward to reveal the holes.
5.6 Preparing the Seatbelt Buckle Bracket: This is the mounting bracket for the seatbelt buckle.
5.7 Installing the Seatbelt Buckle: Place the OEM BMW seatbelt buckle into the bracket and secure it with the supplied bolt and nut.
5.8 Reconnecting the Seatbelt Buckle: Reconnect the yellow plug and insert the entire buckle bracket into the L-bracket. Loosely insert the bolts into the holes you noted in step 5.2. Make sure to route the cable underneath the bracket.
5.9 Placing the Seat in the Car: Widen the L-brackets slightly to make room for the seat. Carefully place the seat inside the car between the brackets.
5.10 Attaching the Seat to the L-Brackets: Start threading the bolts into the bucket seat. If you still have the OEM interior, space near the transmission tunnel can be tight. Good lighting helps to see the holes in the seat clearly. Having a second person hold the seat in position while you install the bolts can also be useful. Be careful not to scratch the seat, and avoid cross-threading the bolts. The seat’s mounting inserts are embedded directly in the fiberglass or carbon fiber shell—if they break out or get damaged, they are very difficult or even impossible to repair. Handle them with care and do not overtighten.
5.11 Using the Right Tools for Tight Spaces: I use a small ratchet (Wera Zyklop Mini) for tight spaces—it makes working in these areas much easier and avoids frustration. If you don’t have one, you can also cut down the short side of an Allen key for better clearance.
5.12 Checking Clearance with a Small Ratchet: Here you can see how well the small ratchet fits in the tight space. It’s not something you’ll need often, but when you do, you’ll be glad you have it.
5.13 Tightening the Seat Bolts: The bolts securing the seat should be torqued to 30 Nm (22 lb-ft).
5.14 Adjusting the Seat Position: Since we only loosely installed the L-bracket bolts in step 5.4, we can now fine-tune the seat position. Shift the seat inward or outward until you are sitting centrally in front of the steering wheel.
5.15 Securing the L-Brackets: Once you’ve found a centered position, tighten all four L-bracket bolts to 30 Nm (22 lb-ft).
5.16 Using a Crowfoot for Tight Spaces: In my case, the seat was so low in the rear that I couldn’t fit a torque wrench with a socket onto the nuts. Of course, you could just use a standard wrench and go by feel (Good and tight), but that’s not how I like to do things. My background is in aviation, where every bolt is torqued to spec. To solve this issue, I used a crowfoot wrench to reach the bolts. However, keep in mind that using a crowfoot changes the torque lever length, so you’ll need to adjust the torque setting accordingly. There are formulas and online calculators to determine the correct torque value.
6. Reinstalling the Seatbelt
6.1 Threading the Seatbelt: Now that the seat is securely installed, it’s time to reinstall the stock seatbelt if you are keeping it. Thread the three-point seatbelt through the side opening of the Recaro Pole Position. Make sure the belt is not twisted.
6.2 Securing the Seatbelt in the Footwell: Reattach the seatbelt to the mounting point in the rear footwell and secure it with the Torx 50 bolt.
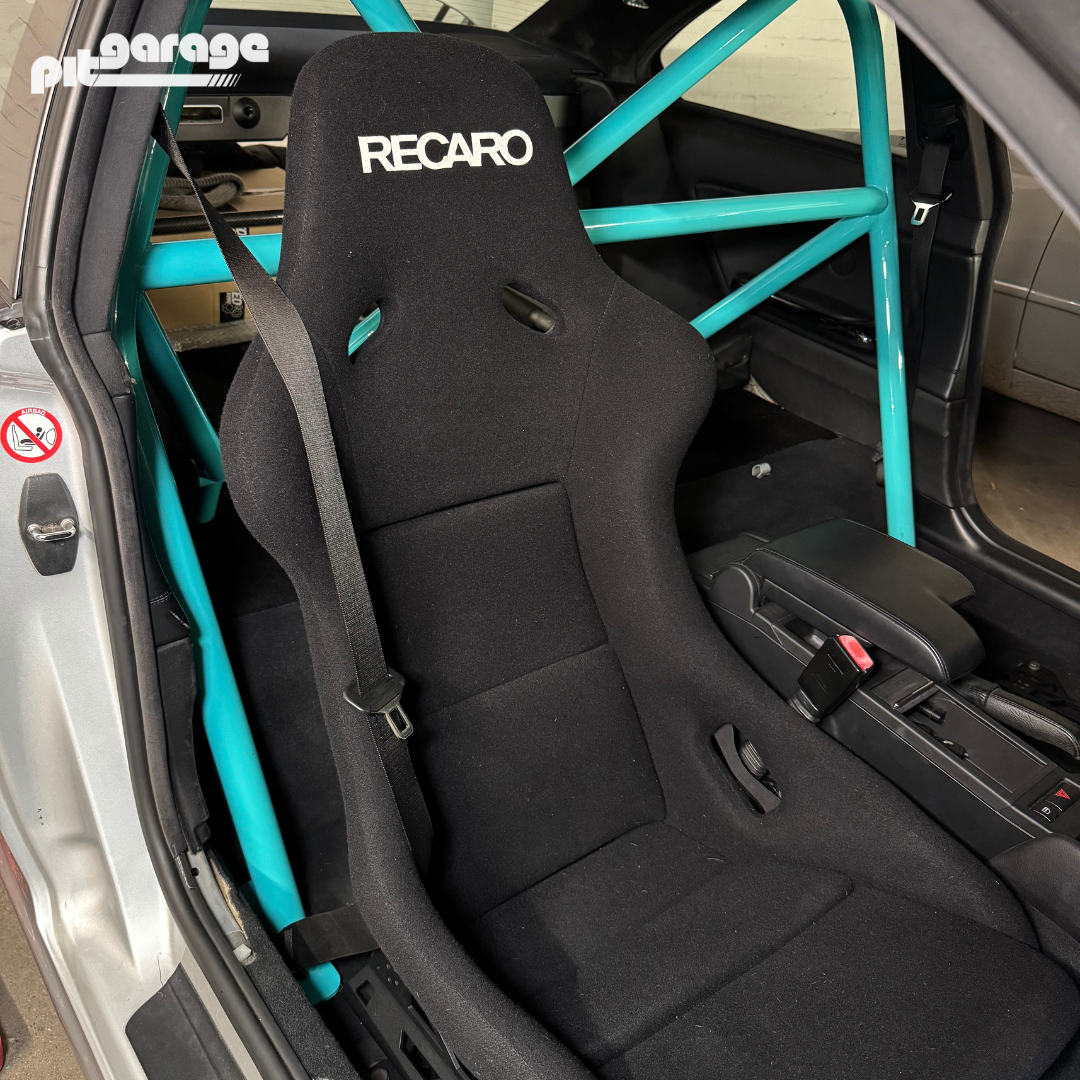
6.3 Final Result: This is the final result. Now repeat the process for the other seat—usually, the second one goes much faster!
7. Weight Summary – How Much Was Saved?
7.1 Weight Summary: Let’s break down how much weight was removed and what was added back in.
Seatbelt Buckle Mount (Including Bolts): 0.5 kg (1.1 lb)
Total Weight Saved:
Removed: 58 kg (127.9 lb) Added Back: 31.95 kg (70.4 lb) Final Weight Savings: 26.05 kg (57.5 lb)
7.2 Take It for a Test Drive: The best part of installing new parts? Taking your car for a test drive! I think we all have a favorite road, a few corners, or a highway on-ramp that we know like the back of our hand and love to push through. After installing new parts, I always enjoy driving those familiar turns to see how the car feels. Enjoy the drive and feel the difference!


")


")


")